Upcycling: Transforming a tea box into doll furniture
Hi there! I can't belive summer is over! It feels like last week when I did my finals, and all of the sudden, I'm back in college again. I'm quite happy that I've managed to write a couple of posts per month, but, as usual, I haven't had time to do all the crafts or write all the posts that I had in mind. Since I was quite busy with my house renovation, I tried to focus on simple projects and posts, because I knew that, if I got into a complex project, it would end up abandoned. I wasn't going to do any type of "craft" posts, but since this is a makeover, I don't think it will take me as long as making a craft from scratch.
How did I get this idea? Well, I can't take full credit. Quick backstory: A few weeks ago I came across an Instagram post from Bonequea, who found some cheap wooden items and had transformed them into stunning furniture. Here is her original IG post. I really do encourage you to follow her on Instagram, her photos are stunning and I look up to her. By examining the photo, I managed to figure out what she did, however, she explained more or less the process in a blog post. You can check it out here, but it's written in spanish. Also, she doesn't really go "in depth" with the process. I will try to explain everything step by step, as I prefer to explain something that is obvious than have you wondering how did I do that. Being that said, let's start!
I found this two pine/ fir tree wooden boxes. This are supposed to be used to store tea and other brews. The large one does say "infusions" in one of the sides. Today I'm only going to transform the small one, as I still haven't figured out what to do with the big one.

Besides that, you will need some other suplies:

I would say this is quite a simple craft for an adult. I think none of my readers are younger than 25 years old, but, since this is the Internet, and you're a child that has found this page, ask an adult to help you out. Also, excuse my hands. I've had a bad eccema going on for a while. It's better now, but some of my fingers are a bit flaky.
I start by removing the bolts from the fastener and the hinges. If you don't have an screwdriver thin enough, you may be able to remove them by pushing them with a flat screwdriver. Be careful if you try that, as you may break the box. If you want to have some sort of glass door cupboard, just remove the fastener.

This is what we have so far. The lid could be used for a future craft, if I wanted to make a glass table.

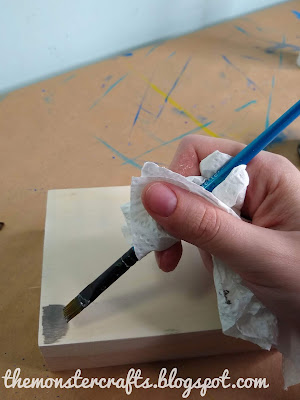
Once that's done, cover the holes with a bit of putty. My holes are so small that I may have been able to cover by putting a thick layer of primer. Let the putty dry for, at least, 1 hour.

Sand it gently to remove any imperfections or bumps.

I decided to paint it dark grey. You've probably seen me use this brand before. It's an spanish manufacturer called Titan, that makes this craft paint called Acualux in two finishes: matt and satin. I feel like the mat formula is better quality and has more coverage. Unfortunately, they don't make all the colors in their matt formula.

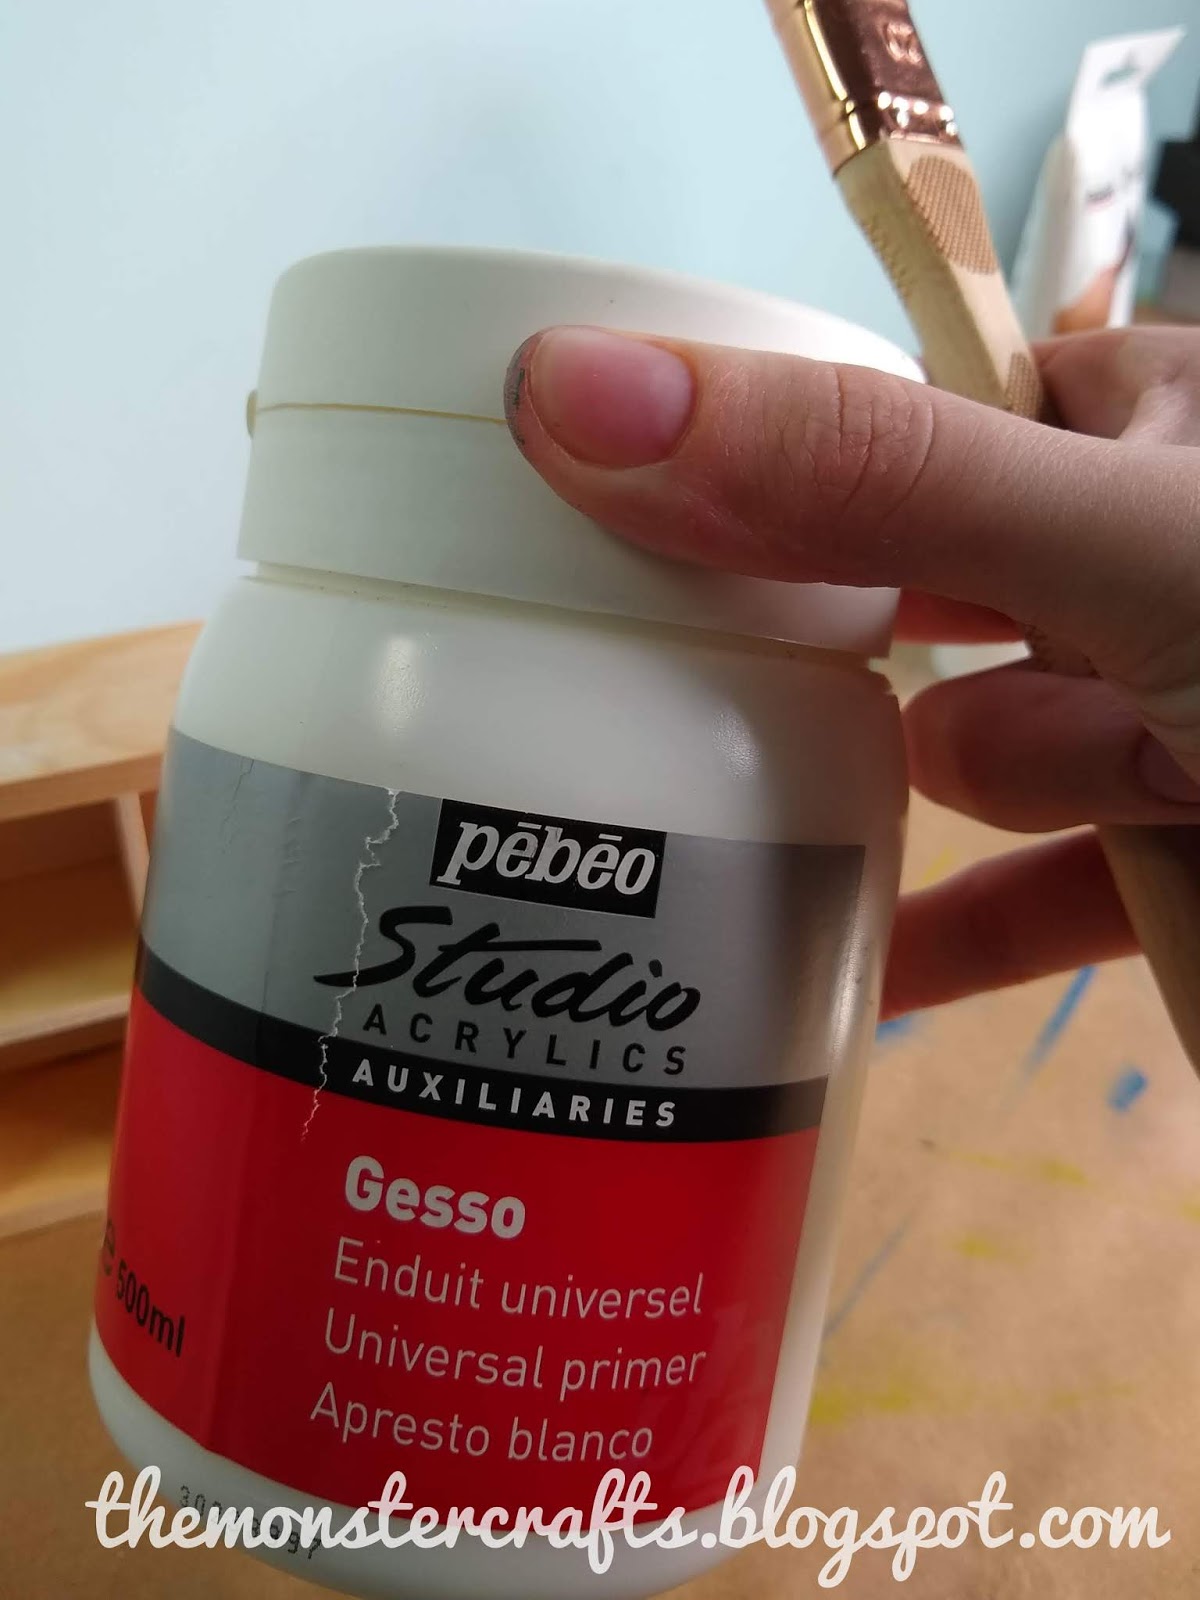
I decided to make a small test on the back of the furniture to see if it will need a primer or I can skip it. The wood is very porous, so it definitely needs a primer.
I decided to go with gesso as a primer. It often works well on porous surfaces such as cardboard or even canvas. It's quite an inexpensive primer, and there are also ways to make your own gesso for a lower price, but I already had this one at home.

Painting in between the shelves is a bit of a pain, but we'll get there. The shelves are glued and I can't remove them to paint them quicker.

Let you primer dry properly. Gesso often takes 24 hours to fully dry, but if you used a different primer, it may take less. Also, I would recommend that you gently sand your primer once is dried, as some primers (specially multi-surface primers) have a rough finish. Also, primers can crystallize if you let them dry for too long.
Then I started painting the back and the sides. Little tip: paint following the lines of the wood, it looks better. Of course, when you start painting the shelves, it will be a bit harder to do so.

Then, paint the inside

Give as many coats as needed. In between coats, you can paint the legs. I've chosen to paint them the same color, but you can paint them in a different color if you want to. I do prefer to paint first and then assemble. It's just personal preference, you can glue the pieces first and then paint it if you prefer to do so. I just feel it's easier this way, specially if you're painting in different colors. You can always touch it up once the glue has dried down.

Now it's time to glue everything in place. If you don't find anything that works for the legs, you can always trim the bottom with popsicle sticks (like Bonequea did in one of the pieces) or cut thick wooden dowels to make your own legs. Of course, you can leave like it is and jump this step.

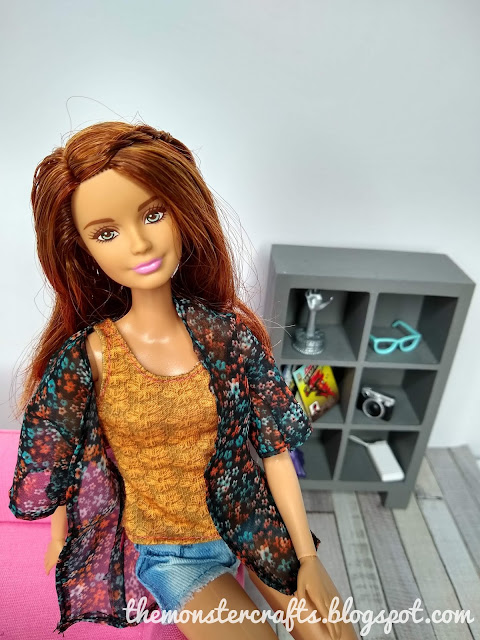
This is how it looks like.

Now, this is the hardest part: you have to leave it dry for a few days. I would suggest you leave it dry for a week or so before putting stuff in the shelves, as it can leave an impression in the paint. I would also recommend to leave it dry for a while if a child is going to play with it. In that case, giving it a top coat or varnish could be a great idea aswell. Once it fully dries, your dolls can enjoy it.

This craft wasn't very time consuming. It took me longer because I've been really busy this days, but if you focus on just doing this, it will take you a couple of days (consider the drying times of the paint and glue). I would also say that it's quite a cheap project. I already had everything I needed except the box, the cubes and the wood filler (which you can skip).

If you can't find a box that has the inside divided like this one, you can always get a regular one and make sheves using some plywood. It will take you a bit longer, but it would allow you to paint the back of the bookcase in a different color.

I set up a quick diorama using some cardstock paper, wallpaper and the couch that came with the IKEA Huset set.

Since some of you seem to enjoy my "behind the scenes" photos, here's how everything is set up.

Hope you guys enjoyed this post and that it gave you some ideas for your doll house. If you make your own version of this, make sure to let me know leaving a coment in any post. Or send me a DM on Instagram or other social media. I'd love to see you creations.
College starts in a few days and I don't know if I'll find time to post during the school year, so this may be my last post for a few months. I will try to write another post, but I can't promise anything. The school year always starts alright but, by the end of October, mi life is a trainwreck.

Also, I don't know if you noticed a difference in my lightning, but Mr. Monster surprised me with a ring light a few weeks ago. I wasn't planning on getting one until we moved home, but he found a good deal and surprised me. I'm still figuring out how to set it in a way it works for me, but we'll get there eventually.
Hope you're all doing great and that you have an amazing fall/autumn. Take care!
M.C.
Social Media:
Facebook Twitter Instagram Tumblr

How did I get this idea? Well, I can't take full credit. Quick backstory: A few weeks ago I came across an Instagram post from Bonequea, who found some cheap wooden items and had transformed them into stunning furniture. Here is her original IG post. I really do encourage you to follow her on Instagram, her photos are stunning and I look up to her. By examining the photo, I managed to figure out what she did, however, she explained more or less the process in a blog post. You can check it out here, but it's written in spanish. Also, she doesn't really go "in depth" with the process. I will try to explain everything step by step, as I prefer to explain something that is obvious than have you wondering how did I do that. Being that said, let's start!
I found this two pine/ fir tree wooden boxes. This are supposed to be used to store tea and other brews. The large one does say "infusions" in one of the sides. Today I'm only going to transform the small one, as I still haven't figured out what to do with the big one.

Besides that, you will need some other suplies:
- Putty for wood or a multi-purpose putty.
- An screwdriver to remove the bolts.
- Craft paint, acrylic paint or chalk paint. You can use stain too.
- Brushes or a roller.
- Sanding paper or sanding blocks, to sand the putty.
- Primer for wood or multi surface primer. This may be optional, depending on the wood or the paint you choose.
- White glue (optional)
- Beads or little cubes of wood made for crafting (for the legs of the shelf, optional).

I would say this is quite a simple craft for an adult. I think none of my readers are younger than 25 years old, but, since this is the Internet, and you're a child that has found this page, ask an adult to help you out. Also, excuse my hands. I've had a bad eccema going on for a while. It's better now, but some of my fingers are a bit flaky.
I start by removing the bolts from the fastener and the hinges. If you don't have an screwdriver thin enough, you may be able to remove them by pushing them with a flat screwdriver. Be careful if you try that, as you may break the box. If you want to have some sort of glass door cupboard, just remove the fastener.

This is what we have so far. The lid could be used for a future craft, if I wanted to make a glass table.

Once that's done, cover the holes with a bit of putty. My holes are so small that I may have been able to cover by putting a thick layer of primer. Let the putty dry for, at least, 1 hour.

Sand it gently to remove any imperfections or bumps.

I decided to paint it dark grey. You've probably seen me use this brand before. It's an spanish manufacturer called Titan, that makes this craft paint called Acualux in two finishes: matt and satin. I feel like the mat formula is better quality and has more coverage. Unfortunately, they don't make all the colors in their matt formula.

I decided to make a small test on the back of the furniture to see if it will need a primer or I can skip it. The wood is very porous, so it definitely needs a primer.

I decided to go with gesso as a primer. It often works well on porous surfaces such as cardboard or even canvas. It's quite an inexpensive primer, and there are also ways to make your own gesso for a lower price, but I already had this one at home.
Painting in between the shelves is a bit of a pain, but we'll get there. The shelves are glued and I can't remove them to paint them quicker.

Let you primer dry properly. Gesso often takes 24 hours to fully dry, but if you used a different primer, it may take less. Also, I would recommend that you gently sand your primer once is dried, as some primers (specially multi-surface primers) have a rough finish. Also, primers can crystallize if you let them dry for too long.
Then I started painting the back and the sides. Little tip: paint following the lines of the wood, it looks better. Of course, when you start painting the shelves, it will be a bit harder to do so.

Then, paint the inside

Give as many coats as needed. In between coats, you can paint the legs. I've chosen to paint them the same color, but you can paint them in a different color if you want to. I do prefer to paint first and then assemble. It's just personal preference, you can glue the pieces first and then paint it if you prefer to do so. I just feel it's easier this way, specially if you're painting in different colors. You can always touch it up once the glue has dried down.

Now it's time to glue everything in place. If you don't find anything that works for the legs, you can always trim the bottom with popsicle sticks (like Bonequea did in one of the pieces) or cut thick wooden dowels to make your own legs. Of course, you can leave like it is and jump this step.

This is how it looks like.

Now, this is the hardest part: you have to leave it dry for a few days. I would suggest you leave it dry for a week or so before putting stuff in the shelves, as it can leave an impression in the paint. I would also recommend to leave it dry for a while if a child is going to play with it. In that case, giving it a top coat or varnish could be a great idea aswell. Once it fully dries, your dolls can enjoy it.

This craft wasn't very time consuming. It took me longer because I've been really busy this days, but if you focus on just doing this, it will take you a couple of days (consider the drying times of the paint and glue). I would also say that it's quite a cheap project. I already had everything I needed except the box, the cubes and the wood filler (which you can skip).

If you can't find a box that has the inside divided like this one, you can always get a regular one and make sheves using some plywood. It will take you a bit longer, but it would allow you to paint the back of the bookcase in a different color.

I set up a quick diorama using some cardstock paper, wallpaper and the couch that came with the IKEA Huset set.

Since some of you seem to enjoy my "behind the scenes" photos, here's how everything is set up.

Hope you guys enjoyed this post and that it gave you some ideas for your doll house. If you make your own version of this, make sure to let me know leaving a coment in any post. Or send me a DM on Instagram or other social media. I'd love to see you creations.
College starts in a few days and I don't know if I'll find time to post during the school year, so this may be my last post for a few months. I will try to write another post, but I can't promise anything. The school year always starts alright but, by the end of October, mi life is a trainwreck.

Also, I don't know if you noticed a difference in my lightning, but Mr. Monster surprised me with a ring light a few weeks ago. I wasn't planning on getting one until we moved home, but he found a good deal and surprised me. I'm still figuring out how to set it in a way it works for me, but we'll get there eventually.
Hope you're all doing great and that you have an amazing fall/autumn. Take care!
M.C.
Social Media:
Facebook Twitter Instagram Tumblr


Thank you so much for explaining how you made this. I really love how it turned out and I hope I can find a similar tea box like this to try to make this cute little shelf. That is so cool about the ring light, I have also been thinking about getting one because I can never find good natural lighting in my house that has a solid background next to it. My studio umbrella lights are so big and bulky that I hate setting them up so I was actually thinking about getting a ring light as well since it is smaller and seems to have a similar effect. Good luck with the new semester and I totally know what you mean about being so busy and not having time for crafts and dolls! It can be frustrating but it is what it is for now :-)
ReplyDeleteHi Farrah! I'm glad you like it and I would love to see your version of this craft. The lighting in my current house is quite bad, and I tried to improve it in my doll room by using two desk lamps covered in tissue paper. It works sometimes.
DeleteFun fact: I always get the best doll related ideas when I'm super busy with school, which is quite frustrating. Then I have a few months of holidays and I can't make everything I would like to do.
Thanks for stopping by.
What a great craft tutorial! I've been seeing Bonequea's pictures on Flickr for a very long time; she does put a lot of effort into her pictures. I would love to be able to make such perfect scenes.
ReplyDeleteThe ring light is a good idea. I have a photo tent, but not everything can be photographed in there, especially not elaborate scenes. I also have the two lights that came with the tent, but they are difficult to use without the tent to diffuse the light. I have some things I want to work on, but I hadn't thought about the ring light. It was so nice of your husband to get that for you.
I hope you find a little time to do doll things during college, but if not, we'll be looking forward to seeing you back!
I think Sandra (aka Bonequea) is part of a repaint and OOAK studio called "Plastic Lab". I love their work, that's the style of repaint that I'd like to do (if I could do repaints).
DeleteI've been paying attention to her dioramas and I've realized that she makes separate walls and floors, and then she puts them together for the photos. That's actually an idea I had been considering. I could make, for example, one marble effect floor and then two different walls. So, I would have two different rooms, without having to build two dioramas. It would also be easier to storage that way.
My husband is the absolute best. He had been doing research on photography stuff on his own. I should have suspected something when he started asking questions about the size of Barbie dolls.
I'll definitely try to post something, even if it's not very elaborated. Thanks for your kind words, I'm already looking forward to be back.
Very nice tutorial MC, I always enjoy seeing how other people use things to make dolly props.
ReplyDeleteBig hugs,
X
Thanks Xanadu. I also like to see what others use for dioramas, specially if they keep it simple and easy to find.
DeleteHugs to you too!
Thank you for sharing this. Many years ago I did something similar for my dolls house using a cigar box, it made the perfect book shelf and was a bright sunny lemon colour. I know that our local cheap Chinese shops have lots of cute pine boxes that I always think would look great as dolls furniture, I just never seem to get around to doing it though these days!!!
ReplyDeleteBig hugs x
Hi Sharon! In fact, I got the tea boxes and the beads from the chinese shop. If you ever give a try to this project, make sure to let me know, as I'd love to see your creation. I'm also curious about that yellow cigar box.
DeleteThanks for stopping by.
Great tutorial and links! Thank you for sharing this, it is with simple things one can make beautiful furniture to dollies! :)
ReplyDeleteHi again! Thanks I'm glad you like it. I try to keep crafts as simple as possible, so anyone can make them.
DeleteThanks for taking time to keep up with my posts. I really appreciate it.