How to: Doll-size crate console. An experiment
If you've been following this blog for quite some time, you might know that I'm currently focusing on making walls and props for my doll photography. My plan is to have a bunch of props that I can mix and match to give a sense of variety to my photos; instead of having to make bulky one theme dioramas that I have no room to fit. Some I've made them based on someone else's idea, and some are my original ideas.
When I made my Doll Size crate bookcase, I started thinking about other types of furniture that could be made with crates, but that wouldn't be as time-consuming as that one. So, I came up with the idea of making a doll size console with just two crates, so that way it would be way easier to make multiple in different colors. I'm not sure if console is the right name for this type of furniture. For what I understand, "console" can be those pieces of furniture often found in a hallway where you can leave your keys when you get home.
Because I didn't have a visual reference for this craft, it was quite challenging to envision the final result. I did a couple of mistakes, but luckily nothing that can't be fixed if I make a second version of this craft. Also, due to the pandemic restrictions, I couldn't get all the craft supplies that I needed, so I had to work with whatever I had at home. So, with any further ado, let's start.
For this craft you will need:
- Popsicle sticks.
- Glue. I always use white glue, but hot glue would be fine.
- Wooden dowels.
- Scissors to cut the popsicle sticks.
- A small saw to cut the wooden dowels.
- Craft paint.
- Paint brushes.
I've made several posts on how to make doll size crates, but for this project I decided to try a new crate design. However, if you decide to recreate this project, you can make it with the original crate design.
To make up my mind about the right size for this craft, I draw two 6 cm wide rectangles on a piece of paper, to have a visual reference to compare next to my doll. Here's a comparison with my colorful crates.
I start as usual, by aligning 5 popsicle sticks and marking them at 6 cm (2,36 in).
Cut them on the line drawn. For that, I use pruning scissors, which make the cutting process much easier.
Lay all the cut sticks together. Measure a stick to go across. I'm making it slightly shorter than the width of the sticks. This is going to be the back of our console, so we don't want sticks peaking out.
Glue them going across. I glued them slightly separated from the edge. Sand the edges if your pieces have any imperfections.
Measure a stick the same width as the longer part and cut it out.
You will need to cut 4 of these for one side of the crate.
Measure and cut two more pieces to go across, like we just did. This time we're going to glue them close to the edge. You will need to make two pieces like this, one for each side.
Now is time to assemble it. Take the first piece we made and place it with the bare face facing up (therefore, the pieces going across should be facing down). Then glue one of the side pieces with the bare face facing out.
Repeat with the other piece. This is what you should have.
Now is time to "connect" the two sides. Let's start by measuring a popsicle stick the same width of the gap.
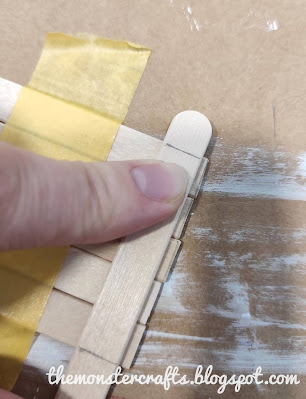
Cut it and glue them in place. Remember to start with the top and bottom pieces and leave the middle one last. Also, keep in mind that you need to do this on both sides.
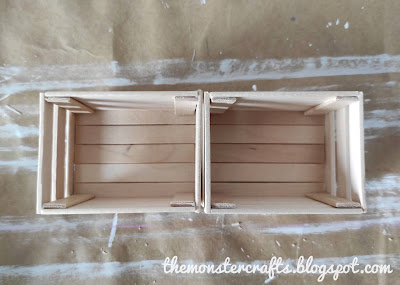
Finally, our crate is finished. Here's a comparison with a regular shape crate, so you can easily see the difference.
Make two crates. You can either work on both at the same time or make one after the other, as you prefer.
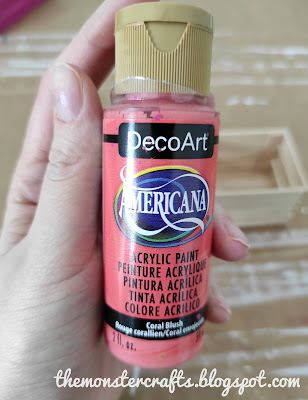
Now it's time for my favorite part: painting. I chose to go with the color Coral Blush by Americana Acrylics because I wanted something bright to add a pop of color to my backgrounds.
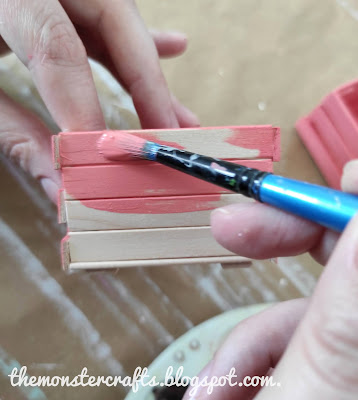
I like to paint the pieces before gluing together and then give touch ups if needed.
Once the paint has dried down it is time to glue them together. Try to glue them in a way that it will hide any imperfections you might have made.
Now, here is where things start going south. Because I was busy with other things, I set this project aside for a few days and didn't find time to finish it. The weekend I had planned to finish it, I woke up with a migraine that lasted 4 days. The first day that I was feeling better I decided to keep working on it and that was probably the reason I didn't make the best choices. But let's continue.
Now it's time to start working on the legs. In my original idea, I wanted to use square shaped legs, but I didn't manage to find square wooden dowels or craft sticks anywhere. When I started the project the situation here was quite concerning and the restrictions were stricter, so I decided to go with what I had at home, which were round wooden dowels. I decided to go with the thinner one.
Taking a doll as a guide, I thought that 12 cm (4,72 inch) would be the perfect size. Spoiler alert, later on I will find out they're too long.
Now it's time to cut them. I chose to saw them using a small saw that I had at home because the pruning scissors might leave an impression on the dowel. To saw them, hold them firmly using a screw clamp, or ask someone to help you out. I personally found it easier if Mr. Monster held it for me instead of using the clamp.
If you made any imperfections while cutting, sand them down.
This is what we have. You will need to make 4 of these.
Now it's time for the staining process. This was a little experiment, since I had never stained wood using acrylics. I did try two techniques: first, I mixed some brown acrylic with clear podge (similar to a clear acrylic varnish and medium). Second, I thinned some brown acrylic with water. I did save some leftovers from the popsicle sticks to test the staining first and choose the technique that worked best. I chose the acrylic thinned with water.
As you can tell from the photo below, the brown that I chose has a cold purple undertone. This is how my dowels looked after one coat.
Since I didn't think that this color would work with the crates, I tried to warm it up. I mixed water with another brown, Dark Chocolate by Americana, and luckily that one had a warmer undertone. I had to give my dowels two coats of the warmer brown until I got a color I was happy with. Despite the initial mistake, I'm quite happy with the final result. Had it not worked out, my "plan B" was to paint them in solid brown.
Remember that I said that I regretted making my dowels so long? Well, I did a small test next to my doll before gluing them down I didn't like how it looked. So, I ended up cutting off 1 cm of each dowel, leaving my legs at 11 cm each (4.33 inches). So, yeah, if you make this, just make sure that your legs are the right size from the begginning.
Now it's time to glue our legs. Before starting, I measure and mark where I want my legs to be, because I just can't eyeball that.
Glue them in place and wait for the glue to dry. Plot twist: I put too much glue in one of the legs, and it accidentally slipped and, it's not perfectly aligned with the one in front of it.
Now it's time to flip it over and see how it looks. I'm not going to lie, I thought it looked terrible. The proportions aren't quite right and clearly the legs are too long. I also think that, had I managed to find square dowels it would look sturdier. I felt quite disappointed in it.
 |
| Test shot |
However, despite not liking it, I decided to give it a go and try it on a scene. Much to my delight, it doesn't look as bad as I thought.
The proportions aren't quite right yet, and the color doesn't pop as much as I expected, but it's not a bad start. Keep in mind that this is meant to just be a background element for the photos, not the focus of attention.
Overall, I'm quite happy with this project, even though it has some flaws. I would like to make it again, but with some adjustments to try to improve it (aka, shorter legs). Now that things are starting to calm down I might be able to go out and find square wooden dowels. I would also like to start working on other crafts and miniature furniture that don't involve popsicle sticks. I do like making these because it's quite easy for most people to find them and work with them, but I also want to try new things.
For my next post, I want to talk about the upcoming Monster High reboot. I know I'm late to the party, but I really want to write a thought out post instead of rushing it and just report on the news. After that, I don't know what will I write about, I'm a little "lost".
In other news, I finished my HTML course last week. It has a second part which goes more in deep, but I decided to take this week off, so I could work on some content for my blog. Also, Mr. Monster is still working from home. He was supposed to stay home for just a month until mid-February, but his company has decided they should stay home until mid-April. I like it because he keeps me company while I craft, and he likes it because he can wake up later.
So what do you guys think? Will you make something similar? Would you like to see more "popsicle furniture" or are you tired of it?
I hope you are all doing well, and I'll see you on my next post.
Monster Crafts
For more craft projects, check out the doll crafts tag.








I like seeing what you make with popsicle sticks, even if I don't make something similar. You're getting quite a nice collection of photography backgrounds and props together. I keep hopping from one idea to the other because I want something new. I am trying to put together a bar diorama for St. Patrick's Day, which will be different from anything I've done before.
ReplyDeleteI keep thinking that I should study HTML, since I am interested in web pages, but I've just never made a real effort. I'm jealous that Monster High is getting a reboot. I'd like to hope that Ever After High will come back too, although everybody says that Disney has cornered the fairy tale market. But I think Disney Descendants has run its course, so maybe Ever After High could grab some attention again, if Mattel put effort into the details.
Hi Barb! I'm glad you like them, and I do have more ideas, I'm happy with the collection I'm getting, but it's never enought because there's always a new color or design to try out. A bar sounds like a nice diorama to have, so your dolls have a place to hang out. Looking forward to see it.
DeleteIf you're interested in HTML, Google has several free courses, just search for Google Activate or Learn with Google. I've also heard about an app called Mimo, but i've never used it.
I hope that, if Monster High's comeback is succesful, they will try to do something with Ever After High. The rumour is that they're relaunching the core dolls from Monster High in their signature looks, so maybe they could do the same with Ever After High. I believe the success of Descendats played a huge role on the downfall of Ever After High, but not that it's long gone there's room for more princess/fairy tale stuff.
Thanks for stopping by.
Hi MC. I agree with Linda. With its rounded legs, your console looks very vintage 1950's. You do such a great job with your popsicle crafts!!! Great post!
ReplyDeleteHi April. Some of the furniture I used for inspiration had those "50s legs", so I do see that. Thanks, I'm glad that you like my projects. Thanks for stopping by.
DeleteHi Linda. Yes, that's true. I was inspired by several pieces of furniture, and one of them was very mid-century looking. I have a few ideas of variants for this design and in one of them I've considered gluing the legs at an angle, like in the 50s.
ReplyDeleteI'm glad that you find my posts useful and the instructions clear. I'm always concerned that people might not understand what I'm trying to say or if the photos aren't clear. I've considered making Youtube videos to complement the posts, but that takes time and a set up that I don't have at the moment.
I have written code, but nothing that has been made public. I want to use what I learn to edit my blog from the code. Now Blogger doesn't seem to offer the same custom possiblities that it used to. You can find free resources to learn the very basics.
Yes, they were collector, and quite pricey. One of my biggest concern is that the price point might be much higher than it used to. Can't wait to see your new blog.
Have a nice weekend you too.
Oh my I love this!! It looks very vintage but so in scale and I think it is lovely ;3
ReplyDeleteYou do a great job!
Thanks Musume, I'm glad you like it. I do think the legs are too long, but overall I do agree it looks fine. Thanks you for your kind words.
DeleteI always enjoy your creative posts MC, it's a pleasure to see someone make something interesting from simple things like popsicle sticks. And I agree with Linda this particular piece is looking very mid-century, but it does accomplish what you set out to achieve and certainly adds interest to your photos.
ReplyDeleteKeep the projects coming, have fun with and enjoy!
Biggest hugs,
X
Thanks Xanadu! I actually believe that you can make great stuff from the most simple things. Even though the goal wasn't to make it mid-century looking, I quite like it, since I like mid-century inspired decor.
DeleteI do have more ideas for future projects, so stay tuned. Big hugs to you too.
Just keep those popsicle crafts coming, I enjoy reading and looking at the photos! So creative, fun and easy!
ReplyDeleteThank you Niina! I try to make them easy, so anyone can recreate them.
Delete