Doll Furniture: Coffee Table
Hello everyone! How are you?
Sorry I haven't posted in a while, but working on this craft has taken me longer than expected, and also my computer crashed and I had to send it to the technical service. Right now, I don't have my own computer, so I'm posting this from Mr. Monster's laptop. I hope I can get it soon, so I can post on a more regular basis.
A few days ago I started working on this craft. I'd love to do a doll coffee shop at some point in the future, but I'm feeling that probably that's a too ambitious project to finish before college starts. So, I'm working on some small furniture pieces and a cereal box room inspired by some of My Froggy Stuff videos. I wanted this coffee table to look worn out (some may call it shabby chic), like the type of furniture you could find in a beach house. Do you want to know how I did it? Let's start.
I started by cutting a rectangle that's 11x7 cm from a cookie box to use it as a pattern. Then, I traced several more, around 6 or 8. Then, I cut them and glued them together.
I want to make the top look like it has slates, so I'm going to draw them on the last piece. I draw a rectangle inside the table that's 1cm separated from the outer line.
Then I divided the inner rectangle into stripes that are 1cm width each one.
I also draw small lines from the outer rectangle corners to the inner corners.
Now it's time to cut the pieces.
Once all the pieces are cut down, it's time to glue them to the rectangle.
The table needs some legs, so draw some long stripes 1cm wide and then cut them in 6cm long pieces. I cut 6 or 7 for each leg and then glued them together.
Once everything was completely dried, I sanded the edges to make it smooth.
Clean the dust and then glue the legs in place. I glued them 1cm separated from the edge.
While waiting for the glue to dry. I cut some thin 0.5cm stripes to go in between the table legs. I cut 4 for each side of the table and then proceed as before.
This is starting to look like a table
Once everything has completely dried, it's time for some painting. I chose this color from Folk Art (is it the same as Americana?) called Light Periwinkle. I think that this color is discontinued now, because I haven't seen it in the new color chart, but they had some left in one of my local paint shops.
I wanted to give this table a distressed look or worn out, which is very fashionable nowadays. Usually, when you want to do this effect on 1:1 furniture, you will apply some clear wax on the areas you want the paint to come off, so thats what I did. Sorry, I didn't take photos of that, but I applied some wax with a thin brush on the edges and some areas.
The wax will take 2 to 4 hours to dry, so once that's done, you can paint on top. I painted it with a white acrylic paint, the same brand I used on previous posts. The white doesn't seem to cover as much as the other two colors I've used, but because I wanted the table to look old, that didn't really matter.
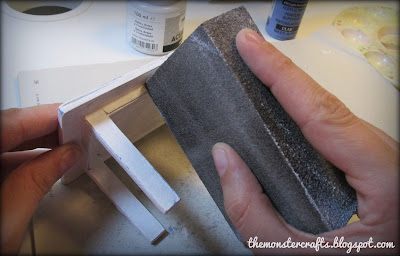
Once the paint has dried, sand the edges and the areas you put wax on to make the paint come off. I used a combination of steel wool, a nail file and a sanding block. I thought that the steel wool would be the best, but it was hard to make the paint come off with that. The block sanded the best, but some areas are hard to reach with it.
And we're finally done.
I'm quite happy with this project, despite it didn't turn out 100% as I expected. Maybe for the next project I'll use the wax of a candle instead of wood wax. Also, I'll try to find a better option for sanding.
I did this table because I want to place it on a summer house or living room scenario for doll photography. Right now I don't have more living room furniture than this pink Ikea sofa, but it'll give you an idea.
I hope I can blog soon, but I'm using Mr. Monster's computer and sometimes he needs it, so I don't know when will I be able to post.
So what do you guys think of my coffee table? Have you been working on some crafts?
M.C.
Sorry I haven't posted in a while, but working on this craft has taken me longer than expected, and also my computer crashed and I had to send it to the technical service. Right now, I don't have my own computer, so I'm posting this from Mr. Monster's laptop. I hope I can get it soon, so I can post on a more regular basis.
A few days ago I started working on this craft. I'd love to do a doll coffee shop at some point in the future, but I'm feeling that probably that's a too ambitious project to finish before college starts. So, I'm working on some small furniture pieces and a cereal box room inspired by some of My Froggy Stuff videos. I wanted this coffee table to look worn out (some may call it shabby chic), like the type of furniture you could find in a beach house. Do you want to know how I did it? Let's start.
I started by cutting a rectangle that's 11x7 cm from a cookie box to use it as a pattern. Then, I traced several more, around 6 or 8. Then, I cut them and glued them together.
I want to make the top look like it has slates, so I'm going to draw them on the last piece. I draw a rectangle inside the table that's 1cm separated from the outer line.
Then I divided the inner rectangle into stripes that are 1cm width each one.
I also draw small lines from the outer rectangle corners to the inner corners.
Now it's time to cut the pieces.
Once all the pieces are cut down, it's time to glue them to the rectangle.
 |
| Sorry for the blurry phone pic. |
The table needs some legs, so draw some long stripes 1cm wide and then cut them in 6cm long pieces. I cut 6 or 7 for each leg and then glued them together.
Once everything was completely dried, I sanded the edges to make it smooth.
Clean the dust and then glue the legs in place. I glued them 1cm separated from the edge.
While waiting for the glue to dry. I cut some thin 0.5cm stripes to go in between the table legs. I cut 4 for each side of the table and then proceed as before.
This is starting to look like a table
Once everything has completely dried, it's time for some painting. I chose this color from Folk Art (is it the same as Americana?) called Light Periwinkle. I think that this color is discontinued now, because I haven't seen it in the new color chart, but they had some left in one of my local paint shops.
I wanted to give this table a distressed look or worn out, which is very fashionable nowadays. Usually, when you want to do this effect on 1:1 furniture, you will apply some clear wax on the areas you want the paint to come off, so thats what I did. Sorry, I didn't take photos of that, but I applied some wax with a thin brush on the edges and some areas.
The wax will take 2 to 4 hours to dry, so once that's done, you can paint on top. I painted it with a white acrylic paint, the same brand I used on previous posts. The white doesn't seem to cover as much as the other two colors I've used, but because I wanted the table to look old, that didn't really matter.
Once the paint has dried, sand the edges and the areas you put wax on to make the paint come off. I used a combination of steel wool, a nail file and a sanding block. I thought that the steel wool would be the best, but it was hard to make the paint come off with that. The block sanded the best, but some areas are hard to reach with it.
And we're finally done.
I'm quite happy with this project, despite it didn't turn out 100% as I expected. Maybe for the next project I'll use the wax of a candle instead of wood wax. Also, I'll try to find a better option for sanding.
I did this table because I want to place it on a summer house or living room scenario for doll photography. Right now I don't have more living room furniture than this pink Ikea sofa, but it'll give you an idea.
I hope I can blog soon, but I'm using Mr. Monster's computer and sometimes he needs it, so I don't know when will I be able to post.
So what do you guys think of my coffee table? Have you been working on some crafts?
M.C.


Wonderful little table -- and made out of cereal boxes!!! Well done and I love the step by step instruction accompanied with all the pictures.
ReplyDeleteHello Nina, welcome to my blog! Thank you so much for your lovely comment, I'm glad you like my tutorial and the table.
DeleteCheers!
That is an amazing table, especially being made out of cereal boxes. Also, blue is my favorite color. :)
ReplyDeleteHello Barb! Thank you so much, I'm happy you like it. You can re-size it to fit any doll or to make bigger tables like a dinning table. Blue is one of my favourite colors too, along with shades of purple.
DeleteCheers!
Looks so rustic chic! You did a great job. For as many years as she has been producing videos, I have always said that one week I'm going to take a vacation and spend the entire time making as many My Froggy products as I can. I have yet to take time off though, lol.
ReplyDeleteWill the chairs you made fit under this or the table is more of a sofa table height?
Hello Muff! Thank you so much for your compliment! Shabby chic and distressed look is quite trendy right now. I love to do a crate that looks similar to mathc the table.
DeleteI love My Froggy Stuff! I want to do almost all of her crafts too, but I don't have the time. I'd love to do one of her sofas to match the table, but I can't sew, so I don't know if I will be able to pull it off
This table is a sofa table height, and the chairs I made won't fit next to it.
Thanks for stopping by!
Great job on the table! I love the look of it!
ReplyDeleteThank you so much Georgia Girl! How is that possible that I haven't seen your comment before?
Delete