Making colorful crates
Lately I've been in such a crafty mood and I've been working on several craft projects. On one hand, I've been working on my Mix'n'Match backgrounds part 2, and on the other I've been working on some decor and photography props. But a sudden heat wave has put a pause on my craft, since I not only don't have air conditioner on my doll room, but we've been having problems with the one in the living room (which is just next to the doll room, and I turn it on to cool down both rooms). So, while I wait for everything to go back to normal, I've thought it could be a good idea to start working on this post.
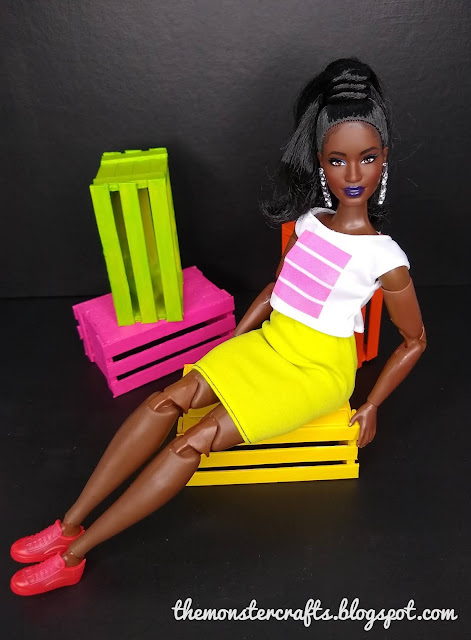


You can either use them as props for your dolls to sit on or lean against or just put them in the background as a pop of color.


 Of course, you can use them with any background you want to. You can choose props that match or contrast your background, or even your doll's outfit. I find that matching your background to a doll is easier with Monster High dolls than with Barbie, since each doll had her own color scheme and were quite bright in general. In this pic of Howleen I chose the blue background and the yellow and orange crates, since they would match her hair and accessories.


When I started working on my backgrounds, I thought it could be fun to make some colorful props or pieces of furniture to contrast with the backgrounds. I was thinking of things the dolls could use to sit on or lean against while posing for the photos and the two things that came to my mind were chairs and crates. I would love to make some chairs in the future, but coming up with a design and make several would have taken a while, so I decided to go with the crates. I did some crates a few years ago in a post titled How to make shabby chic crates for dolls in which I detail the whole process. Since I don't want to make two identical posts, I won't go into such detailed explanation of the process, but rather focus on the things I've done differently and the mistakes I made, so you can learn from them.
For this craft you will need just some popsicle sticks, scissors, glue and some craft paint. Craft at your own risk.
Let's start with the first thing I changed: the tools. On the original post, I made I cut all the pieces with scissors and, after a while, my hands hurt. This time however, I got this pruning scissors and it's much easier to work. This weren't even expensive, and they cut like a dream, so I highly suggest getting a pair if you can.

I made the crates almost the same size as the ones in the original post. I aligned 5 popsicle sticks and marked 8 cm (3.15 inches) along. I thought about using 6 sticks instead of 5, but when I laid them down it didn't look good. I also like to tape my pieces to the table while measuring them.

I made the two first pretty much like on my original post. First, I glued some popsicle sticks going across to make the bottom of the crate.

Then I measured the narrowest side of the base and cut 4 pieces that side. You should be able to get 2 pieces out of each popsicle stick. Then, cut 2 pieces going across and glue them on the edge. You should end up with 3 pieces like this.

Glue the small pieces to the sides, with the vertical pieces facing out. I use a can to hold the pieces in place while they dry.

Now let's glue the pieces that go on the side. Don't forget to glue first the top and bottom one and, finally, the middle one.

I started by making two crates to see how they looked and later on make more. I decided to paint the first one with the same fuchshia that I used in a recent post.

For the second one, I chose a pistachio green from the same brand because I wanted the colors to be bright. Unfortunately, from the first stroke I can tell that the coverage is terrible. I know that bright colors don't tend to be full coverage, but this is basically translucent.

I mixed the green with a bit of yellow to finish the first coat, which helped a bit. Then I went with several coats of the green paint. I can't recall if I had to give 3 or 4. It still looks patchy if you look up close, but from a distance it looks OK.

On the 3rd and 4th crate I decided to try something different. On the base piece, I glued the pieces that go across right on the edge, so I could have more surface to glue the side pieces.

The second thing that I changed this time was painting the pieces before gluing them. It's something I do in other type of crafts, and I wanted to see if it would make painting easier on this craft. I chose an orange for the first crate.

For the fourth crate I chose yellow. Because I didn't want to go to the same pain as with the green crate, for the first coat I mixed the yellow paint with a bit of white, so it would help to conceal the lines of the wood. Then I went in with a coat of yellow.

Once everything is painted, it's time to glue everything in place. Despite painting some areas was a bit easier this way, it slows down the process, as you have to wait for the paint to dry before assembling the crate. It's a technique that works on other crafts, but not really on this one. Here are the final 4 crates:

Now it's time to start using them on doll photos. For a while I had this idea of an all black background with really bright or even neon colored accent pieces. I also have an idea for a black background with bright-colored stripes, that I hope I'll be able to make at some point in the future. Here's a pic of Shea (aka BMR1959).


Photos against an all black background are really hard to take. I experimented a bit with the settings on my phone, and I managed to take a more or less decent photo of Kim. I think I should take the time to learn a few basics of photography if I really want to keep working with a black background.

The doll is leaning against the yellow crate, which is up against the wall. Here's a little behind the scenes. Unfortunately, it's a bit blurry, but you'll get the idea.

Of course, you don't need to use them against a black background. Here I used a white card stock paper for the wall and the white floor I did in a previous post. They're not exact same shade of white, but I don't think it's very noticeable.


This craft was so much fun, and I love the result. They aren't too difficult to do, and they really add a pop of something to the photos. I really encourage you to give this a try and make a few for your doll photos. You don't have to make them like mine, there are tons of colors and the possibilities are endless. For example, you could paint the crates black and use them against an all white backdrop, it could look quite interesting.

I hope you guys enjoyed this post. I definitely want to do more props for doll pics or dioramas, like chairs or shelves, but also I can't stop thinking about making more backgrounds. I should try to combine making props with making backgrounds, to keep things more balanced. Right now I have so many ideas in my head that I feel like I'm all over the place working on several things at the same time, which means they're not getting finished as quickly as they should. Does it ever happen to you?
As usual, let me know what you think in the comment section, as well as if you have any ideas for future posts. I know a few of you mentioned a doll photography tips or "behind the scenes" type of posts, and I definitely want to do that, I just need to think exactly what I want to write.
Hope you're having a great day.
Monster Crafts.
For more fun craft projects, check out the Doll Crafts tag.


Tus cajas miran muy genial! The bright colors that you chose go so well with your aesthetic. I like them against the black background the best, but of course that has to be the hardest to photograph! I want to make some of these for myself.
ReplyDeleteMuchas gracias Barb! I love bright colors for photos, they bring so much joy. It is really hard to photograph, lighter colors tend to appear very saturated next to it. I really encourage you to give it a try, they add something extra to the photos.
DeleteThanks for stopping by.
Lovin' your fun bright colors! They look great in the photos:@)
ReplyDeleteThank you Lynn, I'm glad you like how they look in the photos.
Delete¡Hola! Son chulísimas las cajas, al ser tan coloridas quedan bien con cualquier fondo.
ReplyDeleteLa fotografía no es fácil, fotografiar fondos oscuros pueden ser una pesadilla si no sabes lo que estás haciendo, suerte que hay muchos tutoriales que nos pueden salvar para estos casos XD
Saludos ^^
Hola Lily! Me alegro que te gusten. La idea de tener colores variados era que pudieran combinar con distintos fondos o muñecas.
DeleteLa verdad es que sí que es difícil, y más yo que, en realidad, no tengo ni idea de lo que estoy haciendo. Voy probando ajustando las luces del estudio y los parámetros del móvil, hasta que al final sale. La verdad es que mirar un tutorial no me vendría mal.
Gracias por pasarte.
Thanks Linda. The ones with the black background are my favourites aswell, but also the hardest to take. The good thing about this crates is that it doesn't need to be perfect, since the real life object tends to be quite imperfect or often crooked. I'm glad you liked them. Thank you so much for your nice words.
ReplyDeleteI'm going to bookmark this page and come back to it. Wow!!! First of all, the crates all look fantastic. And secondly, you did a GREAT job on the tutorial! They look so professional! I love the choice of colors and the dolls all appear to be having fun with them as well!
ReplyDeleteHi April! Thanks, I'm glad that you like them that much. I thought that the tutorial wasn't quite great but, since there was a similar post, I wasn't super concerned about it. Yeah, the dolls love them. Now it's so much easier to make them stand up.
DeleteThanks for stopping by.
Oh, I am loving the little colorful crates you are making. There are so many really good uses for them in dioramas. Even in real life size! I am currently making a credenza/hutch for my computer desk using various sizes of prefab crates. I think it would definitely be possible to do the same in Barbie size!
ReplyDeleteHi Phyllis! I'm glad that you like them. A credenza out of crates is a fenomeal idea. I was planning on making a doll-size shelf out of crates later on during the summer, because I'm lacking doll furniture for my dolls, but now you've given me another idea.
DeleteThanks for your lovely comment
Oh so easy and wonderfully colourful, you do come up with some great ideas MC. :) You are an inspiration to us all, it's quite amazing the things one can build out of icypole sticks.
DeleteBig hugs,
X
Thanks Xanadu, I'm glad you find my ideas inspiring. I try to put my ideas out to the world because they might be useful for someone, just like I've been inspired by others. They are indeed quite easy to do, and pretty affordable because those sticks are quite cheap. There are definitely many things you can do with those sticks, just see the comment above.
DeleteHugs to you too.
I love how you are using bold colors. The dolls look beautiful. What a great idea to use crates.
ReplyDeleteHello Dorothy. Thanks, I'm glad that you like the idea and the colors. I'm planning to do more in the future, but I have to get other projects done first.
DeleteThanks for stopping by.
I think these crates are a great idea, I love the bright colours you've chosen and they do work particularly well with the black background.
ReplyDeleteI know exactly what you mean about having so many ideas going around in your head, I am sometimes the very same. It gets to a point when I don't start anything because I have too many ideas and literally don't know where to start....and then I don't start at all!
Your photos are lovely though, really nice and bright which I love in dolly photos.
Big hugs xxx
Hi Sharon! Thanks, I'm glad you like them.
DeleteYes, I've been there too, when you have so many ideas that you even start. This time I've started lots of things, but I've been having trouble finishing them because I'm alredy working on something else. I'm currently working on part 2 of the Mix'n'match backgrounds and I still haven't finished them, despite I started over a week ago.
Thanks for your kind words.
Wow, those colors are so rich, MC 😍 I'm looking forward to seeing what you come up with your new ideas 😉
ReplyDeleteHi Shasha! Thanks, I'm glad you like the colors. I hope to have a new post ready in a week or so.
DeleteThanks for stopping by.
Love these crates and the tutorial is easy too! I should dust my sticks that I have and really do something with them. But I know myself and probably that will not happen in the near future! :D The colors are really great for background props, especially with the darker background. Does wonders!
ReplyDeleteEnjoy the coming weekend!
Hi Niina! Thanks, I'm glad that you like the colors. You're right, they're super easy. I did the first 2 in just one afternoon. It happens to me aswell, that I don't do much for a long period of time, but then I get super active and start getting things done again. I'm planning to do another craft with crates in the near future, probably for september. Maybe by then you'll be done with school and be able to recreate it.
DeleteYou too, enjoy the weekend ahead.
Hi MonsterCrafts,
ReplyDeleteSo, you asked if anyone else ever has the problem of having so many different ideas, pulling them in different directions, that they end up working on multiple projects at once and make slow progress as a result. For me the answer is, all the time. But then, I think most crafters have more unfinished projects lying around than they want to admit.
Signed, Treesa
Hi Treesa. Yes, that's totally true, I have more unfinished project that I would like to think, but I'm getting better at finishing them. I guess that, when creativity kicks in, it's like having an overdose of sugar and you get super excited and all over the place.
DeleteThanks for stopping by.