How to: Textured off-white wall. An experiment
If you've been following my blog for these past two years, you'll know that I've been quite focused in making backgrounds for my doll photos. I've made some colorful ones, but the last few I've made I've been going for a more realistic look. Overall, I'm quite happy with the results I'm getting, but sometimes I feel like my backgrounds look empty. One doll blogger that I love, Bonequea, always has these beautiful doll photos that often don't have much furniture, but don't feel empty. I started to think it could be the textured wall, that made the scene look fuller. So, I decided to give it a try.

A while back, I read on Bonequea's blog that she used thick paint to create the texture, but she didn't give much detail about it. So, taking the "thick paint" statement as a reference, I decided to experiment a bit and create my own textured wall. Keep in mind that this project is an experiment, so I don't really know how things are going to turn out when I start. There's a chance it will go south, but hey, it can be repainted on top.
I started this project back in April, but left it aside to work on other projects and almost forgot about it until now. I more or less remember how I did it, but it's not as fresh as it would have been had I started and finished it the same week.
For this project you will need the same supplies you would use to make the wall: some binding cardboard, acrylic paint and some brushes. I also would recommend, depending on the paint you use, getting some acrylic medium.
I'm doing this project on the back of a wall I have already. Since it's already cut and primed, I'm going to skip this part, but you can check my first mix and match post if you need further information.

I don't have many acrylic paints that have a thick consistency, except for some basic colors, including white. I don't think that white by itself it's going to create any visible texture, so I'll need a base color. My plan is to create a subtle off-white base color and then give the texture using the pure white.

On a plastic cup, I mixed some white acrylic paint with some gray to create a plaster looking color. I started adding some Dove Gray, but it was too subtle, so I added a darker gray. I also added a teaspoon of the acrylic medium, because thick acrylic paint sometimes doesn't run well on this surface and can have some shine to it.
 |
| Add medium |

I tested the paint onto the wall, to see if I liked the color. I did several times through the process, until I was happy with the color. My advice is that you let it dry for a bit, since colors can change a lot from wet to dry.
I kept adding gray and testing until I was happy with what I got. I eyeballed the whole process, so I can't really give much detail. Then I started painting my board.

Doing this, I'm very unsure I'm making the right choices. Will it be too dark? Too light? I want it to have a subtle difference, but not so subtle that it won't show up on camera.

For comparison, I took a photo with my Dove Grey wall (see it on the painted artwork post) and the new wall with the off-white base.
 |
| Dove Gray (left) and the new wall (right) |
Fast forward a few months, it is time to start making the texture with the white paint. It seems like the white will provide some contrast, so let's give this a try.
Picking just a little bit of paint with a brush, I started to gave messy brush strokes on a corner, just to test it. I believe this technique is called "dry brush", so your brush needs to have very little paint on it. I also would recommend using a brush with stiff or rough bristles rather than a soft one. It worked better for me.

I was happy with the test, so I kept going. The movement that I do to get this effect is similar to trying to draw a wide "X", with some random strokes here and there.

Finally, I got to a point when I was happy with what I had.

Once the paint has completely dried down, it's time to test how it looks on camera. I was a bit impatient, so I took just my vitiligo doll and took a few quick photos. It looks quite dull without any furniture, but at least I know that the texture will appear on camera.

Let's try a few photos with some furniture, to see how it looks.


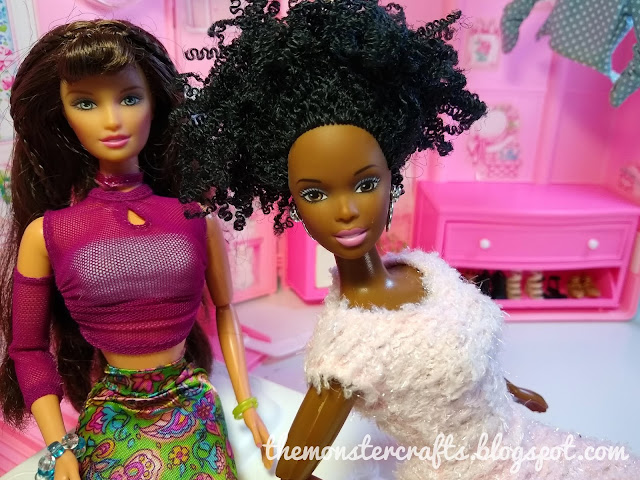
In this photo, Rosie is sitting in the pink IKEA couch. It looks nice, but the texture doesn't stand out so much because I use the portrait mode of my phone. For that very first photo of Victoria, I covered this very same couch with yellow fabric, to change things up.

I wasn't very happy with the photos I took the first day, so a few days later, when I was feeling more inpsired, I gave it another try. Instead of creating a living room scene, I tried to create a bedroom one. I covered a box with some white fabric and pretended it was a bed. Chloe is looking very cute here.

I took these photos just a few days after I finished sewing that pillow, so I featured it in almost all the photos I took that day. I really like this photo of Lea, but it made me realize I need to sew more pillows to make the scene look fuller. Having a bed headboard could have also helped.

I do like the effect of the wall itself, but because it's gray and neutral, it looks a bit dull. I think it also has to do with the fact that almost all of my furniture and accessories are pretty neutral, since I created them to work with colorful walls. Probably this wall could use some colorful items or just something that would contrast with the gray. But the technique itself worked, so I can always try to create a similar wall with other colors.

When I was planning out this project, I also considered using a sponge to create the texture, so that's another experiment I can run later this year. As for now, I have other projects I'd like to finish first before I make another wall.
I hope you guys enjoyed this post. I don't know if I'll be able to post much during July because I have a lot to take care of this month. As some of you know, we just moved home when the pandemic hit, so a lot of things were put on hold. But now that things are going back to normal, we're slowly picking things where we left them. We will receive some new furniture next week, so, we'll probably be busy assembling furniture and putting stuff in place. I can't wait to finally have a proper dining room table, instead of eating on a plastic folding table that is about to disintegrate. We also need to get rid of my old car, which is over 18 years old. It makes me a bit sad because it was my first car, but it's just not worth keeping it.
I hope you guys are having an amazing summer while staying safe and healthy.
Monster Crafts
Check out part 2:
How to: Textured "limewash effect" cream wall
Similar posts:


I had to visit Bonequea just to take a look at the photos and I have to agree with you, great photos and with so little as just some furniture and textured walls.
ReplyDeleteThick paint can give a lot of texture, used with different tools. I have used sponges and fingers, with different results when I have done small paintings or when I just want to test the paint.
The way you made your textured off white wall is great! And the results are amazing. With popping bright colors the background looks very nice. I enjoyed this post!
Hope that it goes well with the assembling of the furniture and putting stuff in place. It can be rather time consuming. But it will be a lovely feeling when all is done. And the feeling of getting rid of ones car is well known at our place. We had a car that we all loved, but one a road trip it just got tired and we just had to sell it. It would have been more expensive to repair and keep the car. It was sad, because the car was so comfy and nice to drive.
Enjoy July and stay safe!
Hi Niina! Bonequea's photos are so beautiful and she has a great aesthetic. I have used her photos and projects as an inspiration.
DeleteMy issue was that most paints that I use had a liquid consistency, so I had very few options with a thick texture. I wand to try the sponge technique with the liquid paint, to have more options.
Yes, it's time consuming, but it'll be so rewarding to finally be able to put stuff in place. Some of our things are still in boxes because we simply don't have anywhere to store them. My car has had a lot of issues these past years, and it's also cheaper to sell it rather than trying to fix it.
You too, enjoy your summer!
Thanks Linda. I more or less have an idea for the sponge texture, we'll see if it works out (when I have more time). I do agree, her taste level is incredible. The bed is simply a doll box covered with fabric, but it does the trick. I also like that outfit a lot, it's one of my favourite doll garments. I actually want to recreate it in another color.
ReplyDeleteThe car thing is a long time coming. We got a new car a few years ago, but we kept my old car because, at that time, we needed two cars. That's not the case anymore, so it's not worth keeping it. I'm really looking forward to have everying assembled and coming together.
You too, have a great weekend. Hugs to you too!
As always an interesting subject full of great ideas! I have another idea that will add texture ~ try soaking some toilet paper in PVC and scrunching it up on a board, let it dry, then paint it in a colour you like. It's messy, but fun!
ReplyDeleteGlad things are getting back to normal for you, new furniture is alway nice and sort of gives you a new lease on life. Don't be in a hurry to get rid of your car, at least not until you have a new one of your own ... being without a car is like losing your independance!
Big hugs,
X
Thanks Xanadu! I do like the idea of using toilet paper to create texture, I will add it to my "To-do" list. I wonder if I should do it on these binding cardboard walls or try to use foam core board.
DeleteWe do have a newer car, which at the moment we barely use. We kept two cars because both of us used to work quite far from home, but it's not the case anymore. So don't worry, we won't be left without a car, and we also have a scooter motorcycle, just in case.
Big hugs to you too.
I really like your new wall and thanks for sharing that technique. Thanks for the instructions! I may have to try that. I think I have seen My Froggy Stuff do some projects adding texture with toilet paper. It may be too wet for foam core board, so it might be better on cardboard or a heavier version of the foam core board. If you give it a try, let us know!
DeleteThanks Phyllis, I'm glad you like it. I was concerned that the instructions might not be clear, so I've been considering filming a short video for my next wall and uploading it on Youtube. I have some scraps from this binding cardboard, which is pretty hard, so I might do a test first before I go full out. I haven't been keeping up with My Froggy Stuff videos, so I'll probably binge watch a few to get ideas.
DeleteThanks for stopping by.
Gracias por un tutorial muy interestante! I think your wall turned out really well, but I also think that there a couple more things that make Bonequea's pictures stand out. One is that her dolls are beautifully repainted, which is hard for the average person to achieve. The other is harder to describe. It's somehow like her colors are more saturated, and the colors she uses are all in similar tones. She also doesn't use a lot of different colors, just a select few. That's what I see when I look at her pictures, but I also think yours appear very natural.
ReplyDeleteHola Barb! Me alegro que te guste! Besides what you pointed out, I think it has also to do with her styling. Her dolls tend to dress very classy, and some of her scenes look quite luxurious. I do like paying attention to her photos and taking ideas from here and there, but trying to make it in "my style", which isn't as defined as hers. I'm happy to hear that you find my photos natural.
DeleteHave a lovely rest of the weekend!
I am always amazed at how you were able to take such a simple and often overlooked idea (creating backgrounds) and turn it into a blog rich with ideas and substance! Your textured background is most interesting and given the multitude of textures and colors that are infinitely possible...I can't wait to see what you come up with next.
DeleteThanks April! Lately the backgrounds are leaning more into the "diorama" category, but since I don't have room to store permanent ones, I make them temporary. I have ideas for other color combos, but those will have to wait since I have other projects in the works.
DeleteThanks for stopping by.
This looks really good! A room in my actual house has textured paint. They used a pearlescent pink and achieved extra texture by brushing it in every direction. I also knew an artist who mixed sand into paint. If you like texture you can try these methods when you get a chance. Your backgrounds keep getting more realistic.
ReplyDeleteThanks BlackKitty! Actually, when I was taking photos it looked silver-ish on camera, so it reminded me of those pearlescent paints. I like the sand idea. I know Pebeo has a medium with some sand on it, so I could check it out and give it a try.
DeleteI'm glad to see that you're back! Hope we can hear from you more often.
Thanks for the heads up Linda! I'm checking it out and some of the dolls from this line are already in Spain, at a pretty decent price I must say. However, that one is not avaliable for some reason.
ReplyDelete