How to: board and batten wall (vertical design)
Hello again my dear dolly friends. It's been almost a month since my last post. A bit longer than I expected, but at least I haven't been gone for months. I did mention last time that I was working on a wall and that I would post the tutorial "very soon". Apparently, "very soon" just means a month later, but never mind. I do have a bit more spare time, but I haven't really taken the time to sit in front of my computer and work on this post. But finally, here we are.
I've been making background walls for a while on this blog, mostly plain walls in a variety of colors. I have tried making textured walls to make them more interesting, but one of the things that I've wanted to tackle for some time is architectural dimension. I did add a bit of that with the wainscots I made for my larger walls, but nothing that would take up the full height of the wall. To be fair, my other walls are huge, but now that I'm working with smaller walls, I feel it's the perfect time to start experimenting with that.
There are lots of ways you can add architectural dimension to your walls, from shiplap to picture framing walls. I've been watching quite a few home DIY videos this past year, and one thing that I've seen being done quite often is board and batten walls. Board and batten walls can come in lots of different designs, from the very popular grid design to something more simple. Since this is my first time doing this, I'm going to keep it simple and go with a vertical design.
The material I'm using is 1,5 mm chipboard. I bought a ton of it during the pandemic because I was scared we would go back to lockdown and I didn't want to get bored. So, I better make use of the supplies I already have than buy new ones.
For this project, I'm going to use the back of my textured wall, which I was keeping blank. This wall is 42cm tall by 37 cm wide, so I need to plan accordingly. I wanted the baseboard to be 1,5cm wide, and the vertical pieces to be 1cm wide. I did cut a few short ones out of a cereal box to get an idea of how it would look and plan out the spacing.
I think that it was Barb who once asked me how do I plan out my projects. I have a notebook where I write down my ideas for blog posts and projects, and where I draw sketches and plan out the sizes. This is what I wrote for this particular project.
Mr. Monster got me a Cricut Maker for Christmas, but I have been so busy with school and life happening that I've had no time to try it until now. From what I've seen, it has a bit of a learning curve. Since this is quite a simple project with very simple shapes, it might be perfect for my first Cricut project.
Getting started with the Cricut was a bit time-consuming, as first I had to update the software and calibrate my blade. For this project, I'm using the knife blade, because it's more suitable to cut hard materials like the 1,5mm chipboard that I'm using. I drew the whole thing on the Cricut's design space and then started cutting. While using the software was fairly simple, I didn't take into consideration the placing of the different pieces on the cutting area, mistaking cm for mm. Oh, well, now I know for next time.
Before gluing them, I primed the pieces using gesso, making sure I was also painting the sides of the chipboard. The wall was already primed, so I skipped that step, but keep in mind that you might want to do that.
Once everything was painted and had dried down, I started gluing the pieces, starting with the baseboard.
Then, I glued the vertical pieces, going from left to right. I did take my sweet time during this part, using a square to help me keep the pieces vertical and being very careful. Next time, I will cut myself a spacer to make my life easier during this part. The one photographed here wasn't very useful, so I will need a better one.
Last but not least, I glued the top part.
Once the glue had completely dried down, it was time for my favorite part: painting. I chose to go with the color Light Buttermilk from Americana Acrylics, which is a very light creamy yellow. It is very subtle and barely-there color, but it is not as striking as sometimes white can be.
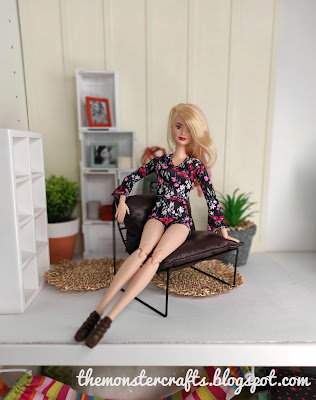
When the paint had completely dried down, it was time to see how it would look on camera. I had a scene already set up since Christmas (I know), so I switched the wall, removed the Christmas decor and I was good to go. Here's a first shot of Victoria.
The vertical pieces look a bit closer than I expected, but maybe if they were more separated they wouldn't give as much dimension to the wall, which would defeat the purpose of the whole project.
While I liked the overall effect, I felt like it looked a bit dull, which is what sometimes happens when you go with very subtle colors. So, I decided to try bringing in the Desert Cactus crate bookshelf.
Bottom line, I like the effect on camera. The idea is very simple, but you can give it a completely different vibe with just a few tweaks, like changing the size of the boards, the distance between them, or just the colors.
 |
| Behind the scenes |
I have plans to keep experimenting with architectural dimension. Making a grid design for my walls has been on my to-do list for a long time. I'm also curious to see how a shiplap design would work on camera. But first, I would like to make two more walls with this exact design. I'm not 100% set on the colors, but I'll probably go with Desert Cactus and Blue Harbor, which you can see pictured down below. However, if you have other suggestions, let me know.
Hope you enjoyed this tutorial. Have you ever done anything like this for your dolls? Let me know how you made it and which materials you used. I'm always willing to learn. As always, feel free to ask me any questions if the instructions weren't clear enough.
As for my next post, I don't have anything planned. I'm in this new mood in which I'm not going to stress myself out about blogging or pump out content for Instagram. In fact, I'm probably not going to create any specific content for Instagram for a while. I've just come to the conclusion that it has been more detrimental for me than inspiring, and we don't want that. So, whatever I can recycle from this blog will be posted there, but not the other way around. I much rather focus my energy here, where I have a community that actually seems to care about what I have to say and that I too genuinely care about what they're up to.
So, in conclusion, I guess I'll see you as soon as I can, with whatever content I feel like posting that day. Until then, I hope you're all doing well. I've been terrible at keeping up with your blogs, but will try my best this time around.
Big hugs
Monster Crafts
Check out the second version of this wall: Video tutorial: Blue Harbor board and batten wall.
This post was first published on themonstercrafts.blogspot.com. If you see it published elsewhere, it's been plagiarized without my consent.


Thank you for another great tutorial! I'm excited that you got a Cricut! I hope that you get a lot of use out of it. I also planned on putting some of my Barbies in my IKEA Billy bookshelf, but I have other dolls that also take up space inside of it. I may have to do some re-arranging of my doll displays.
ReplyDeleteAw, thanks Barb! I do too, hope I can make good use of it. My plan in the long run is to use it to make furniture for dolls, but for now I'm starting with these simpler projects. I did this "room in a bookshelf" thing partially to display some of the furniture I make. I just move stuff around when not in use.
DeleteThanks for stopping by!
¡Hola! Me ha encantado el tutorial, me fascinan las manualidades y que haya gente como tú con tanta maña, pero yo siempre he sido una negada para esto... La pared ha quedado genial y me encanta el diorama con todo el mobiliario, ¡es chulísimo!
ReplyDeleteSobre el tema de publicar con mayor o menor asiduidad, como alguien que ha estado literalmente una década subiendo entradas al blog de forma ininterrumpida, llegué a sentirme mal por dejarlo en stand by, pero es que muchas veces no tenía tiempo y, cuando lo tenía, prefería invertirlo en otras cosas o no me sentía motivada ni con ganas de elaborar posts. Esto no quiere decir que me haya dejado de gustar, ni mucho menos, pero en la vida todo son etapas y en este tiempo he estado centrada en otras cosas. Espero volver, tengo alguna idea sobre qué publicar y, como vuelvo a tener lista de deseos muñequil, ojalá las vaya consiguiendo y os las pueda ir enseñando con el tiempo.
¡Un abrazo!
Muchas gracias Marina. Yo tampoco me considero particularmente mañosa, sobre todo cuando veo cosas mucho más detalladas que hacen otras personas. En realidad, todo es ponerse e intentarlo.
DeleteYo la verdad es que ideas sí tengo, lo que no tengo es tiempo de ejecutarlas y escribir un post dedicado. Además, como dices tú, muchas veces el poco tiempo libre que tengo prefiero dedicarlo a otra cosa como hacer deporte. Pero bueno, poco a poco, que si no puedo subir 8 entradas al año, pues subiré 4.
Un abrazo para tí también
Well done ol' girl, I do enjoy reading your tutorials and this one looks great in your photos MC.
ReplyDeleteI agree with your sentiments about community here, it's much more friendly and it doesn't matter if you need time away, you can come back anytime and still find the same faithful crew of dolly enthusiasts here.
Big hugs,
X
Thanks Xanadu! I'm happy with the effect so far. Now I just need to try some new colors.
DeleteThat is also true. For the most part, it doesn't matter if you need to take time off, as most people are still there when you come back. And they tend to be way more supportive than folks in other platforms.
Big hugs to you too
A beautiful doll room 🥰The wall is great.
ReplyDelete